How to Terraform(2) - 변수와 출력
목차
시리즈 목차⌗
이전 글 복습⌗
이전 글에서 작성한 코드를 다시 한 번 볼까요?
// AWS 프로바이더 설정
provider "aws" {
  // 아시아 태평양(서울) 리전
  region = "ap-northeast-2"
}

resource "aws_instance" "example" {
  // ap-northeast-2 리전의 Ubuntu 20.04 AMI
  ami           = "ami-0c6e5afdd23291f73"
  instance_type = "t2.micro"
  vpc_security_group_ids = [aws_security_group.example.id]

  // 최초 인스턴스 생성 시에만 실행
  user_data = <<-EOF
              #!/bin/bash
              echo "Hello, World" > index.html
              nohup busybox httpd -f -p 8080 &
              EOF

  tags = {
    Name = "terraform-example"
  }
}

resource "aws_security_group" "example" {
  name = "terraform-example"

  // 인바운드 규칙
  ingress {
    from_port   = 8080
    to_port     = 8080
    protocol    = "tcp"
    cidr_blocks = ["0.0.0.0/0"]
  }
}
위 코드에는 몇 가지 개선할 점이 있습니다. 만약 EC2 인스턴스를 몇 개 더 만든다고 했을 때 중복될 만한 부분이 있습니다. AMI ID나 인스턴스 타입 등이 그렇죠. 이렇게 중복될 만한 내용은 변수로 선언하여 중복을 줄일 수 있고, 중복을 줄이면 실수를 줄일 수 있습니다. 또한 EC2 인스턴스에 접근할 수 있는 IP를 AWS 콘솔에서 확인하는 번거로움이 있었습니다. 이 또한 출력을 통해 확인할 수 있습니다. 자 그럼 하나씩 해봅시다!
변수⌗
가장 먼저 AMI ID 부터 변수를 선언해볼까요? main.tf 파일이 있는 위치에 variables.tf 파일을 만들고 아래와 같이 작성해봅시다.
variable "ami_id" {
  type = string
  default = "ami-0c6e5afdd23291f73"
}
변수의 이름은 ami_id이고, 타입은 string입니다. 그리고 default에는 별도로 값이 주어지지 않는 경우 사용할 기본값을 설정합니다. 이제 main.tf 파일에서 ami 속성을 변수를 통해 입력받도록 변경합니다.
resource "aws_instance" "example" {
  ami           = var.ami_id # 변수 ami_id 참조
  instance_type = "t2.micro"
  vpc_security_group_ids = [aws_security_group.example.id]

  ...
}
VS Code를 사용하신다면 Terraform Extension for Visual Studio Code를 꼭 설치하세요! 선언된 변수나 리소스에 대해서 자동완성 기능과 오류 등을 미리 확인할 수 있게 도와줍니다!
기존에 직접 값을 지정했던 ami 속성에 변수 ami_id를 참조하도록 변경했습니다. tf plan을 통해 스크립트에 이상이 없는지 확인합니다. 참고로 지난 시간에 만든 EC2 인스턴스는 tf destroy를 통해 삭제되었다고 가정하겠습니다.
terraform이라고 매번 입력하는게 어려우니 .zshrc나 .bashrc에 다음과 같이 alias 설정을 해서tf로 사용하는 것도 방법입니다.alias tf=terraform
> tf plan

Terraform used the selected providers to generate the following execution plan. Resource actions are indicated with the following
symbols:
  + create

Terraform will perform the following actions:

  # aws_instance.example will be created
  + resource "aws_instance" "example" {
      + ami                                  = "ami-0c6e5afdd23291f73"
      ...
    }

  # aws_security_group.example will be created
  + resource "aws_security_group" "example" {
      ...
    }

Plan: 2 to add, 0 to change, 0 to destroy.

───────────────────────────────────────────────────────────────────────────────────────────────────────────────────────────────────

Note: You didn't use the -out option to save this plan, so Terraform can't guarantee to take exactly these actions if you run
"terraform apply" now.
ami 속성이 변수에 설정된 기본값으로 설정된 걸 확인할 수 있습니다. 그렇다면 기본값 대신에 변수에 값을 넘겨볼까요?
커맨드로 변수 지정하기⌗
tf plan 또는 tf apply를 실행할 때 -var 옵션을 사용하면 변수에 값을 넘길 수 있습니다. -var 옵션은 변수의 개수 만큼 여러 번 사용할 수 있습니다.
> tf plan -var "ami_id=ami-09eb4311cbaecf89d"
...
  # aws_instance.example will be created
  + resource "aws_instance" "example" {
      + ami                                  = "ami-09eb4311cbaecf89d"
      ...
    }
파일로 변수 지정하기⌗
이번에는 terraform.tfvars 파일을 통해 변수에 값을 지정해보겠습니다. terraform.tfvars 파일을 만들고 아래와 같이 작성해봅시다.
ami_id = "ami-09eb4311cbaecf89d"
그리고 tf plan을 실행하면, 동일한 결과를 확인할 수 있습니다.
> tf plan
...
  # aws_instance.example will be created
  + resource "aws_instance" "example" {
      + ami                                  = "ami-09eb4311cbaecf89d"
      ...
    }
파일 이름이 terraform.tfvars 또는 terraform.tfvars.json(json 형태로 작성가능)이거나, 파일 이름이 .auto.tfvars 또는 .auto.tfvars.json으로 끝나는 경우, Terraform 코드가 실행 될 때 자동으로 파일을 읽어서 변수에 값을 지정합니다. 만약 파일 이름 앞서 설명드린 규칙과 다르다면, 파일 이름을 -var-file 옵션을 사용하여 파일을 지정할 수 있습니다.
한 가지 주의 할 점은 terraform.tfvars 파일을 사용하는 경우, 반드시 .gitignore에 terraform.tfvars를 추가해야 합니다! 참고로 gitignore.io를 통해 Terraform의 .gitignore 파일을 생성해보면 다음과 같습니다.
# Created by https://www.toptal.com/developers/gitignore/api/terraform
# Edit at https://www.toptal.com/developers/gitignore?templates=terraform

### Terraform ###
# Local .terraform directories
**/.terraform/*

# .tfstate files
*.tfstate
*.tfstate.*

# Crash log files
crash.log
crash.*.log

# Exclude all .tfvars files, which are likely to contain sensitive data, such as
# password, private keys, and other secrets. These should not be part of version
# control as they are data points which are potentially sensitive and subject
# to change depending on the environment.
*.tfvars
*.tfvars.json

# Ignore override files as they are usually used to override resources locally and so
# are not checked in
override.tf
override.tf.json
*_override.tf
*_override.tf.json

# Include override files you do wish to add to version control using negated pattern
# !example_override.tf

# Include tfplan files to ignore the plan output of command: terraform plan -out=tfplan
# example: *tfplan*

# Ignore CLI configuration files
.terraformrc
terraform.rc

# End of https://www.toptal.com/developers/gitignore/api/terraform
환경변수로 변수 지정하기⌗
마지막으로는 환경변수를 지정하는 방법이 있습니다. TF_VAR_로 시작해서 변수 이름을 적어주면 됩니다. ~/.zshrc등에 환경변수를 적어도 되지만 일단은 확인을 위해 인라인으로 환경변수를 지정해서 tf plan을 실행해보겠습니다.
> TF_VAR_ami_id=ami-09eb4311cbaecf89d tf plan
...
  # aws_instance.example will be created
  + resource "aws_instance" "example" {
      + ami                                  = "ami-09eb4311cbaecf89d"
      ...
    }
변수 작업을 더 해보자⌗
이제 변수를 사용하는 방법을 알았으니 나머지 값들도 변수로 변경하겠습니다.
우선 변수를 선언합니다.
variable "ami_id" {
  type = string
  default = "ami-0c6e5afdd23291f73"
}

variable "instance_type" {
  type = string
  default = "t2.micro"
}

variable "port" {
  type = number
}

variable "cidr_blocks" {
  type = list(string)
  default = ["0.0.0.0/0"]
}
그리고 이 변수를 사용하도록 코드를 변경합니다.
resource "aws_instance" "example" {
  // ap-northeast-2 리전의 Ubuntu 20.04 AMI
  ami           = var.ami_id # 변수 ami_id 참조
  instance_type = var.instance_type
  vpc_security_group_ids = [aws_security_group.example.id]

  // 최초 인스턴스 생성 시에만 실행
  user_data = <<-EOF
              #!/bin/bash
              echo "Hello, World" > index.html
              nohup busybox httpd -f -p ${var.port} &
              EOF

  tags = {
    Name = "terraform-example"
  }
}

resource "aws_security_group" "example" {
  name = "terraform-example"

  // 인바운드 규칙
  ingress {
    from_port   = var.port
    to_port     = var.port
    protocol    = "tcp"
    cidr_blocks = var.cidr_blocks
  }
}
그리고 terraform.tfvars 파일을 사용해서 변수를 지정합니다.
ami_id = "ami-09eb4311cbaecf89d"
port = 8080
마지막으로 tf plan을 실행해서 변수가 잘 작동하는지 확인합니다.
다음은 출력⌗
현재 작성 중인 코드에는 외부에서 EC2 인스턴스에 접근할 수 있는 IP를 확인할 수 있는 방법이 없고, AWS 콘솔에 접속해서 생성된 EC2 인스턴스를 찾아가야만 합니다. 이제 출력값을 설정해서 생성된 EC2 인스턴스의 IP를 확인해 보겠습니다.
outputs.tf 파일을 만들고 아래와 같이 작성합니다.
output "public_ip" {
  value = aws_instance.example.public_ip
  sensitive = false
}
그리고 tf plan을 실행합니다. 그리고 마지막에 출력되는 내용을 잘 보세요!
> tf plan
...
Plan: 2 to add, 0 to change, 0 to destroy.

Changes to Outputs:
  + public_ip = (known after apply)

...
출력값이 추가되었다는 걸 알려주죠? 이 출력값은 EC2 인스턴스가 실제로 만들어진 다음에 확인할 수 있기 때문에 known after apply라고 표시되었습니다. 이제 tf apply를 실행해봅시다.
> tf apply
...
Apply complete! Resources: 2 added, 0 changed, 0 destroyed.

Outputs:

public_ip = "13.209.17.62"
약 1-2분 뒤에 해당 IP의 지정된 포트(기본 값은 8080으로 설정했었죠?)로 접속하면 Hello, World가 출력되는 걸 확인할 수 있습니다.
그런데 이런 출력 값이 있다는 건 어디서 알 수 있는 걸까요? EC2 인스턴스의 공식 문서를 확인해볼까요?
이 문서에는 EC2 인스턴스를 Terraform으로 관리할 때 사용할 수 있는 속성들이 아주 많이, 상세하게 정리되어 있습니다. 여기서 우리가 주목해야 할 곳은 문서 우측 상단의 ON THIS PAGE 영역의 Attribute Reference입니다.
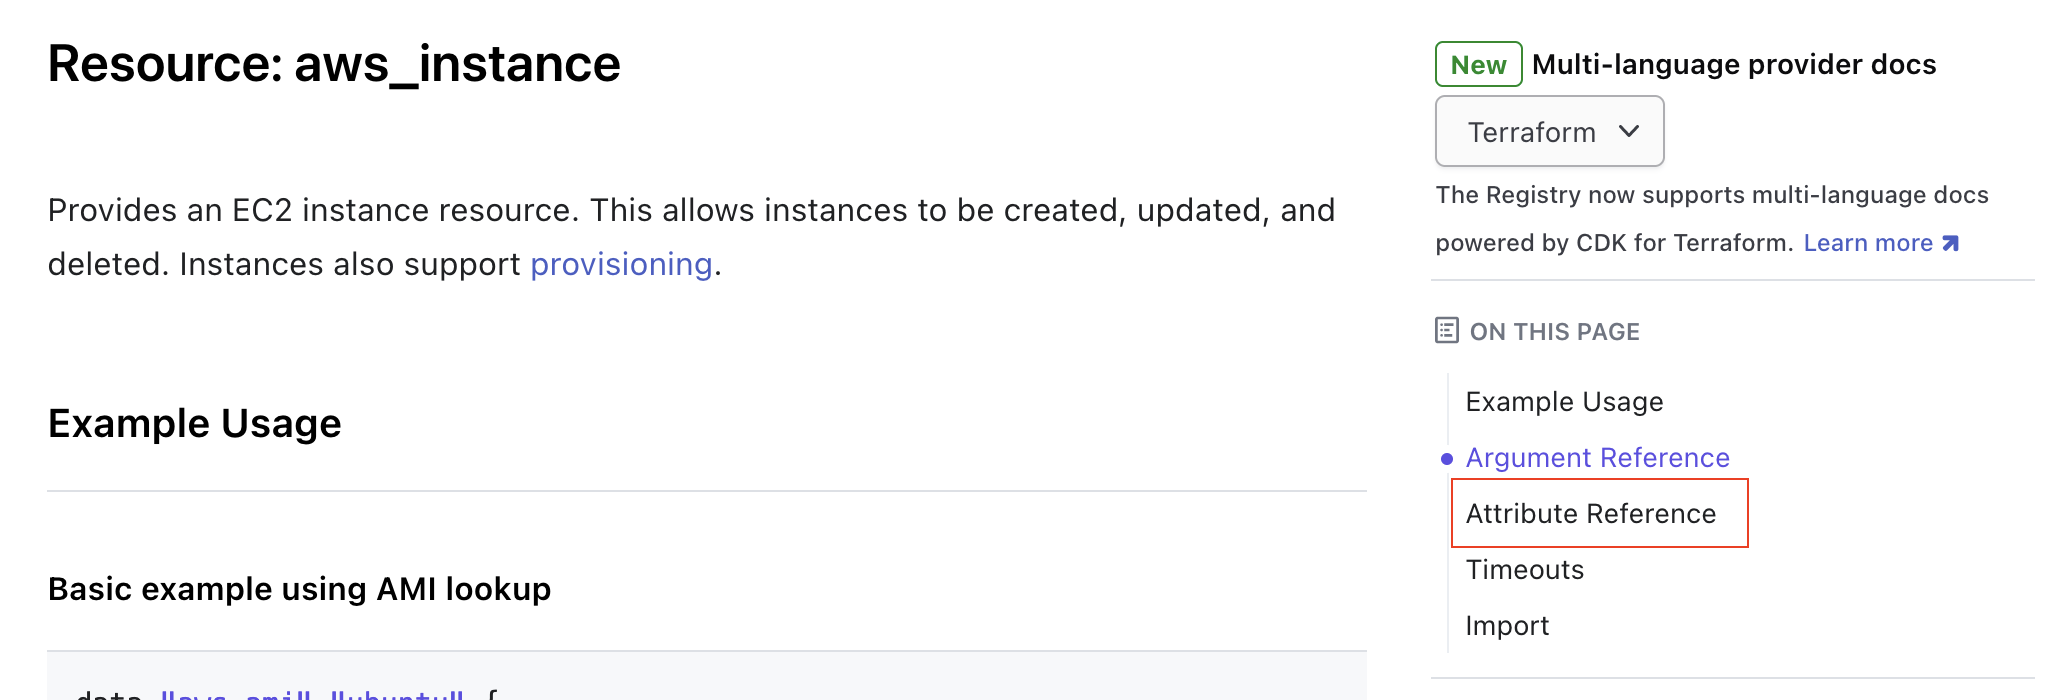
이 영역에는 생성된 EC2 인스턴스를 통해 확인할 수 있는 속성들이 정리되어 있습니다. public_ip를 찾아볼까요?

이렇게 필요한 속성을 찾아서 활용하면 됩니다. 물론… 보시면 알겠지만 속성이 좀 많습니다. 뭐 하다보면 하나씩 눈에 보이는 거죠 하하하하하…
내친 김에 SSH 키도 설정해보자⌗
이번에는 EC2 인스턴스에 접속할 때 SSH 키를 사용하도록 설정해보겠습니다. 먼저 main.tf에서 SSH 키를 생성 및 설정합니다.
...

resource "aws_instance" "example" {
  ...

  key_name = aws_key_pair.ssh.key_name # ssh 키 이름 참조

  tags = {
    Name = "terraform-example"
  }
}

resource "aws_security_group" "example" {
  ...

  // ssh 접속을 위한 인바운드 규칙
  ingress {
    from_port   = 22
    to_port     = 22
    protocol    = "tcp"
    cidr_blocks = var.cidr_blocks
  }
}

# ssh 키 쌍(pair) 생성
resource "tls_private_key" "ssh" {
  algorithm = "RSA"
  rsa_bits  = 4096
}

# ssh 키 쌍(pair) 리소스
resource "aws_key_pair" "ssh" {
  key_name   = "terraform-example"
  public_key = tls_private_key.ssh.public_key_openssh
}
그리고 outputs.tf에 SSH 키를 출력하도록 설정합니다.
output "tls_private_key" {
  value     = tls_private_key.ssh.private_key_pem
  sensitive = true # 민감한 정보이므로 출력하지 않음
}
tls_private_key 리소스는 hashicorp/tls 프로바이더를 통해 제공되므로 tf init을 통해 프로바이더를 설치합니다.
> tf init
Initializing the backend...

Initializing provider plugins...
...
- Installing hashicorp/tls v4.0.4...
- Installed hashicorp/tls v4.0.4 (signed by HashiCorp)

...

Terraform has been successfully initialized!
그리고 tf plan으로 이상이 없는지 확인합니다.
> tf plan
...
Plan: 3 to add, 0 to change, 0 to destroy.

Changes to Outputs:
  + public_ip       = (known after apply)
  + tls_private_key = (sensitive value)
...
이제 tf apply를 실행합니다. 그런데 만약 이전 글의 내용을 따라 오면서 제한된 IAM이 설정된 계정을 사용하신다면 이런 에러가 발생합니다.
> tf apply
...
│ Error: importing EC2 Key Pair (terraform-example): UnauthorizedOperation: You are not authorized to perform this operation. User: arn:aws:iam::246181472423:user/terraform-user is not authorized to perform: ec2:ImportKeyPair on resource:
...
이 작업을 위해서는 여기서 에러가 발생한 ec2:ImportKeyPair, 그리고 ec2:DescribeKeyPairs, ec2:DeleteKeyPair 권한이 필요합니다. 이 권한을 추가해줍시다. 권한을 추가하고 다시 tf apply를 실행합니다.
> tf apply
...
Apply complete! Resources: 2 added, 0 changed, 1 destroyed.

Outputs:

public_ip = "15.164.214.233"
tls_private_key = <sensitive>
tls_private_key는 민감한 정보를 의미하는 sensitive = true로 설정되었으므로 터미널을 통해서는 확인할 수 없습니다. 하지만 EC2에 접속하려면 ssh 파일이 필요하죠? Terraform의 상태로 부터 이 파일을 생성합니다.
> tf output tls_private_key > ~/.ssh/ec2_example.pem
> chmod 400 ~/.ssh/ec2_example.pem # 권한 설정
그리고 생성된 파일을 통해 EC2에 접속해봅시다. 그리고 접속이 확인되면 exit을 통해 접속을 종료합니다.
> ssh -i ~/.ssh/ec2_example.pem ubuntu@15.164.214.233
Welcome to Ubuntu 20.04.6 LTS (GNU/Linux 5.15.0-1048-aws x86_64)
...
ubuntu@ip-172-31-43-230:~$ exit
모두 확인이 되었다면 tf destroy를 통해 리소스를 꼭 삭제 해주세요!
> tf destroy
...
Destroy complete! Resources: 4 destroyed.
하나만 더!⌗
참고로 지금 우리가 사용한 pem 파일은 로컬 폴더의 terraform.tfstate에 저장되어 있어서 언제든지 파일로 생성할 수 있는 상태므로, 이 파일은 권한이 없는 사람들이 접근할 수 없도록 관리되어야 합니다. 만약 이 파일에서 pem 파일을 생성하고 싶지 않다면, 별도로 파일을 생성한 뒤에 생성된 파일을 Terraform 코드를 통해 주입하는 방법이 있습니다.
> ssh-keygen -t rsa -b 4096 -f ~/.ssh/ec2_example
Generating public/private rsa key pair.
Enter passphrase (empty for no passphrase):
Enter same passphrase again:
Your identification has been saved in /Users/onlifecoding/.ssh/ec2_example
...
보안을 위해 passphrase에 원하는 암호를 설정할 수 있으며, 암호를 입력하고 싶지 않은 경우는 그냥 엔터를 누르면 됩니다. 그리고 생성된 파일을 Terraform코드에서 참조하도록 설정합니다.
resource "aws_key_pair" "ssh" {
  key_name   = "terraform-example"
  public_key = file("~/.ssh/ec2_example.pub")
}
이렇게 하면 Terraform의 상태에 키 값을 저장하지 않고도 Terraform 코드를 통해 키 값을 주입할 수 있습니다. 상황에 맞게 적절한 방법을 사용하면 되겠죠!
마치며⌗
사실 Terraform에서 제일 중요한 걸 한 가지 꼽아보자면, Terraform의 상태를 잘 관리하는 겁니다. 지금까지는 Terraform 상태에 대한 고려 없이 그냥 진행했고, 상태는 로컬의 terraform.tfstate파일에 저장되어 있습니다. 다음에는 Terraform의 상태를 어떻게 관리하면 좋을지 살펴보겠습니다.
참고자료⌗
- Terraform Up and Running, 3rd Edition
- Creating SSH Keys for Secure Access to AWS EC2 Instances with Terraform